Showing posts with label Workflow. Show all posts
Showing posts with label Workflow. Show all posts
Thursday, 2 May 2013
Assignment 1 : Reflection
Looking at the assessment criteria for this course now that I have completed Assignment 1, I have come to a number of conclusions:
Demonstration of Technical and Visual Skills materials, techniques, observational skills, visual awareness, design and compositional skills.
This area was the weakest area of my work when I completed the Art of Photography ( 21 out of 40 marks ) and one that I need to focus on more. Looking at this assignment, I feel the technical challenge that the presented itself, primarily lighting, was one that I struggled with and maybe took me away from the creative side of the assignment. Researching and using different techniques to deal with the cloudy bright weather was only partially successful and left me making more adjustments at the processing stage than maybe I would have wished. It was a fine line re how much saturation to apply to give the sense of place that I was seeing with the naked eye. I did find that I was instinctively applying what I'd learnt through completing the exercises while carrying out the assignment though ( e.g. histograms ) but it is still obvious to me that I need to work harder on improving my technical skills.
I think that the final outcome does demonstrate observational skills and visual awareness. In terms of design and compositional skills, some images show better compositional skill at the outset when the original image was taken where others needed to be cropped to improve the composition. The question is whether both approaches are equally valid in terms of demonstrating good compositional skill.
Quality of outcome content, application of knowledge, presentation of work in a coherent manner, discernment, conceptualisation of thoughts, communication of ideas.
If I am honest, I am not sure about the content of the images as I am not sure quite was is meant here. However, I do feel that I made a good stab at explaining what I intended to do and how the workflow went.
Demonstration of Creativity imagination, experimentation, invention, development of a personal voice.
Not my most creative work is the best way to sum this assignment up and in this respects I feel a little disappointed in the outcome of this work. Hindsight is a great thing but at this stage I feel that I would have been better engaging the folk that work around Camber Dock and portraying this human element rather than the more abstract aspect that I eventually opted for. A much earlier start to the day would have conjured up more action that would have infused the images.
Context reflection, research, critical thinking ( learning log)
The research that I carried out was very much limited to the technical side of the assignment. I do need to carry out more photographic research before and during assignments. Interestingly, having seen the Deutsche Borse Photography Prize 2013 shortlist, in particular Chris Killip's work, I feel that I'd would have been better bringing out the human interest aspect of Camber Dock.

Assignment one : Workflow
Camber Dock
I thought quite a while about what subject to focus on for this assignment and opted to explore Camber Dock in Portsmouth which I felt offered a range of subjects from working fishing boats, leisure craft and a well known fish market all bound by residential buildings.
1 Preparation
I researched the Camber Dock area e.g. opening times of the Fish Market that I wanted to visit. Given the consistent weather forecasts indicating cold, cloudy weather, I also checked out on the internet what techniques fellow photographers were using to overcome dull or at best cloudy / bright weather to see whether there were any tips I could pick up on. This led me to taking the tripod on every site shoot so that I could use as wide aperture as I needed avoiding camera shake and a circular polariser. Other checks covered the battery level and storage capacity of the memory card being used. Also decided to re calibrate my computer monitor and printer in readiness for printing the final selection of images.
2 Site visits
An initial and brief visit to primarily walk the area ( as the weather was not very good that day ) made me think that a straightforward landscape approach for outside images could likely produce pedestrian / picture postcard views. Looking at the theme from a different angle I decided that action shots and images that captured the range of colour,texture and pattern that constantly drew my eye as I walked around the dock might work better.
3 Capture images
I completed two site visits and combined the images taken on both days. This was worth doing since the weather was different on both days giving a different perspective for the images. I tried different approaches e.g. bracketing to see how the images might be improved on site. Inevitably images were deleted on site but given the light difficulties I did have to bring the majority taken back home since it proved too difficult to see the impact of the changes on the camera display screen.
4 Technical edit
The technical edit reduced the images down to 156 images. At this stage, I started to think what I really need from software to allow me to easily make value judgements and how best to organise the material. In the past I have created my own filing system of folders and subfolders and this simple approach has worked well so far. Experimenting with Photoshop came unstuck due to some kind of corruption of software but up to the point of becoming aware of the software problems I was not convinced that that approach provided me with an improved approach re-organisation within the workflow. That said, it is early days and I feel the need to persevere with getting to grips with the 'Organiser' side of things once I have sorted the software problem. My fall-back position looked to be using Windows Photo Gallery to grade the photos at the first selection stage.
5 First selection
At this stage I had to decide what software to use given the problems I was having with Photoshop's interaction with my hard drive. In the end I opted to not use Photoshop for organising / tagging the images. Using Photo Gallery's system of star rating, I looked
for images that drew my eye from the point of view of content e.g. texture, colour, pattern, sense of place etc. I was probably not critical enough at this stage since the initial selection came to 70 images ( three star ).
6 Second selection
Applying a more critical eye and using Photo Gallery processing software, I now came down to 19 images ( four star ). At this point I decided to give myself a break from looking at the images so that I could come back to the review stage with a fresh eye.
 7 Review
Worth standing back for a while as I found it much easier to choose the final selection of 12 images ( 5 star ).

8 Final selection
Each image was then numbered using my current numbering scheme and given a caption containing technical detail. The final selection is more abstract than reality perhaps...
I had to use the telephoto lens here to get close enough to the subject
to try and capture the beautiful reflection that I could see from afar. I took
the photo at a slight angle as I wanted to achieve an abstract image. Try as I
might I could not capture very well the slight tremor in the water which
reminded me of impressionism. Again I increased the saturation and contrast to bring
out the colour and shape.
9 Backup /archiving
The 12 final images were backed up on an external hard drive as usual.
10 Prints
8 prints were taken. Despite re-calibrating my computer display and printer, the prints were not as good a match in colour as I would have wished.
11 Conclusion
As I worked through this assignment, I wondered how what I chose to to do in terms of the workflow process might differ from what others might do here. I think the key area may be the selection process and how images are tagged for future and retrospective use. I still feel more comfortable with my customary practice of using folders to differentiate the levels of selection rather than grading with say a star based system which I felt somehow slowed things down for me. That said, this may well be the process of learning and getting used to a new approach getting in the way. Once I have sorted the Photoshop software problem, I think I will persevere here for a while longer so that lack of familiarity with the 'Organiser ' side of things does not influence my thinking here as to what to use in the future.
I thought quite a while about what subject to focus on for this assignment and opted to explore Camber Dock in Portsmouth which I felt offered a range of subjects from working fishing boats, leisure craft and a well known fish market all bound by residential buildings.
1 Preparation
I researched the Camber Dock area e.g. opening times of the Fish Market that I wanted to visit. Given the consistent weather forecasts indicating cold, cloudy weather, I also checked out on the internet what techniques fellow photographers were using to overcome dull or at best cloudy / bright weather to see whether there were any tips I could pick up on. This led me to taking the tripod on every site shoot so that I could use as wide aperture as I needed avoiding camera shake and a circular polariser. Other checks covered the battery level and storage capacity of the memory card being used. Also decided to re calibrate my computer monitor and printer in readiness for printing the final selection of images.
2 Site visits
An initial and brief visit to primarily walk the area ( as the weather was not very good that day ) made me think that a straightforward landscape approach for outside images could likely produce pedestrian / picture postcard views. Looking at the theme from a different angle I decided that action shots and images that captured the range of colour,texture and pattern that constantly drew my eye as I walked around the dock might work better.
3 Capture images
I completed two site visits and combined the images taken on both days. This was worth doing since the weather was different on both days giving a different perspective for the images. I tried different approaches e.g. bracketing to see how the images might be improved on site. Inevitably images were deleted on site but given the light difficulties I did have to bring the majority taken back home since it proved too difficult to see the impact of the changes on the camera display screen.
4 Technical edit
The technical edit reduced the images down to 156 images. At this stage, I started to think what I really need from software to allow me to easily make value judgements and how best to organise the material. In the past I have created my own filing system of folders and subfolders and this simple approach has worked well so far. Experimenting with Photoshop came unstuck due to some kind of corruption of software but up to the point of becoming aware of the software problems I was not convinced that that approach provided me with an improved approach re-organisation within the workflow. That said, it is early days and I feel the need to persevere with getting to grips with the 'Organiser' side of things once I have sorted the software problem. My fall-back position looked to be using Windows Photo Gallery to grade the photos at the first selection stage.
5 First selection
At this stage I had to decide what software to use given the problems I was having with Photoshop's interaction with my hard drive. In the end I opted to not use Photoshop for organising / tagging the images. Using Photo Gallery's system of star rating, I looked
for images that drew my eye from the point of view of content e.g. texture, colour, pattern, sense of place etc. I was probably not critical enough at this stage since the initial selection came to 70 images ( three star ).
6 Second selection
Applying a more critical eye and using Photo Gallery processing software, I now came down to 19 images ( four star ). At this point I decided to give myself a break from looking at the images so that I could come back to the review stage with a fresh eye.

Worth standing back for a while as I found it much easier to choose the final selection of 12 images ( 5 star ).

8 Final selection
Each image was then numbered using my current numbering scheme and given a caption containing technical detail. The final selection is more abstract than reality perhaps...
 |
| P488 :f3.5 @ 1/400 ISO 200 +0.3exp. 18mm Cloudy WB |
I liked
the angle of this shot ( P488 ) which emphasises the shape of the boats against the sky.
I decided to adjust the saturation for this image to bring out the colour more.
 |
| P489: f5.6 @ 1/50 ISO 100 55mm Cloudy WB cropped |
In
the above image the reflections emphasised by the blue cable caught my eye first.
The swan was a bonus given it was on the move at the time.
 |
| P490: f4.5 @ 1/320 ISO 100 148mm cropped Cloudy WB |
I
wanted to capture the swan juxtaposed against the incoming fishing boat which
meant taking the shot quickly. The cropping was slight and vertical from the
left. I also adjusted the contrast increasing it a little. I’m happy with the
result liking the position of bollard, swan and boat …
 |
| P491: f4.5 @ 1/80 ISO 100 18mm Cloudy WB |
The
intention here is to draw the audience from the boat coming in to the catch i.e. the oysters framed within the yellow structure of the boat…a
natural frame so to speak. The image came out a little dark so I increase the
brightness and saturation a little.
 |
| P492: f4 @ 1/125 @ 1/125 ISO 100 28mm Cloudy WB cropped |
What
attracted me here in P492 was the rich colour of the inside of the boat, the blue working
gloves and the crab leg left over from the morning’s work. I did try cropping
more closely to bring together the linked images of gloves and crab leg but
lost a lot of the rich colour, pattern and shape so drew back to this
composition. Saturation was increased a little to enhance the colours.
 |
| P493: F14 @ 1/160 ISO 200 55mm AWB cropped |
I really like the outcome of this shot i.e. the composition,
colour and reflection of the dock pub in the water.
 |
| P494: f13 @ 1/25 ISO 400 -0.7exp. 24mm AWB cropped |
I spent some time in the fish market trying all kinds of
shots of fish, the working area, the imagery and notices on the walls etc. to try and convey a sense of place.This lobster was quite splendid and I think tilting
the shot works well.
 |
| P495: f5.6 @ 1/50 ISO 800 27mm Cloudy WB cropped |
You couldn’t miss this sign as it faced the entrance. Obviously
seen better days and somehow the broom leaning against it seemed to emphasise
this. There was very much a tension in the indoor fish market between the up to
date fresh fish presented in a safe and healthy environment and signs like this
one set on the periphery of activity.
 |
| P496: f8 @ 1/13 ISO 800 24mm AWB |
Until
now I didn’t realise how difficult it actually is to photograph dead fish in a
way that hints at the live animal. The eyes always indicate freshness apparently
but capturing the beautiful markings took a number of shots from different
angles and ISO settings. I increased the contrast slightly when processing this
image to enhance the markings.
 |
| P497: f8 @ 1/30 ISO 100 37mm AWB |
I chose this image ( P497) because I liked the composition. I turned
it round to view it in portrait rather than landscape as I think it works
better that way. Contrast, saturation and brightness have all been increased
slightly.
 |
| P498: F5.6 @ 1/30 ISO 100 31mm Cloudy WB |
What drew my eye here were the shells and stones trapped
behind this piece of fishing gear plus the rhythmic pattern and contrast of
colours. I increased the contrast and brightness a little to enhance the image.
 |
| P499: F4 @ 1/160 ISO 100 114mm Cloudy WB |
9 Backup /archiving
The 12 final images were backed up on an external hard drive as usual.
10 Prints
8 prints were taken. Despite re-calibrating my computer display and printer, the prints were not as good a match in colour as I would have wished.
As I worked through this assignment, I wondered how what I chose to to do in terms of the workflow process might differ from what others might do here. I think the key area may be the selection process and how images are tagged for future and retrospective use. I still feel more comfortable with my customary practice of using folders to differentiate the levels of selection rather than grading with say a star based system which I felt somehow slowed things down for me. That said, this may well be the process of learning and getting used to a new approach getting in the way. Once I have sorted the Photoshop software problem, I think I will persevere here for a while longer so that lack of familiarity with the 'Organiser ' side of things does not influence my thinking here as to what to use in the future.
Thursday, 11 April 2013
Editing
For this exercise I have used 52 images taken last month at Canoe Lake in Southsea. The lake has a visitor attraction which comprises large boats shaped like swans. At this time of the year they are kept moored in the centre of the lake often surrounded by a large number of real swans attracted to the lake by the promise of food from passers-by. While I was initially attracted by the idea of capturing images of real and make believe swans at the end of the day, the real swans became the subject of this exercise being more of a challenge in photographic terms.The workflow for this exercise was broken down into the following stages :
Step one - the technical edit
This edit reduced the number of images to 26.
This edit reduced the number of images to 26.
Step two - the selects
I used a star rating system to identify those images that worked in creative terms.
I used a star rating system to identify those images that worked in creative terms.
Step three - the first selects
The first selects came to 8 in number i.e. those rated as 4 or 5 star.
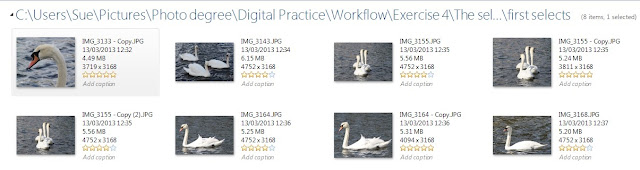
The first selects came to 8 in number i.e. those rated as 4 or 5 star.

Step four - group and review
Looking closely at the first selects again after a few days had passed, I decided the ratings given were still sound.
Step five - a final choice
Using the same star rating I looked again at the first selects and opted to review the three 5 star rated images below.
Using the same star rating I looked again at the first selects and opted to review the three 5 star rated images below.
 |
| P485: f14 @ 1/60 ISO 200 -0.7exp 300mm cropped |
 |
| P486: f14 @1/250 ISO 200 180mm cropped |
 |
| P487: f14 @ 1/200 ISO 200 259mm |
Knowing that I now had to choose only two of the three images, concentrated the mind and
finally opted for P485 and P486. I chose P485 as I liked the way the image showed the swan as less an iconic unruffled regal image more a moment captured in time i.e. with water dripping off its beak and the wind ruffling the bird's feathers. P486 was more about the play of the sunlight on both water and birds. The arrangement of birds conjured up the idea of a small flotilla calmly sailing away across the choppy water.
Looking back at the editing process here, I'm left wondering not so much about the process of editing as the exercises have very much endorsed a way of working that I follow but more what software I should use to assist in the process. Using Photoshop Elements Organiser is proving more of a problem than a help due to some kind of gremlin which is proving difficult to sort.
Tuesday, 9 April 2013
Histogram
For this exercise I needed to find and shoot the three most basic categories of scene by contrast i.e low, average and high contrast.
Low contrast
Average contrast
High contrast
A further increase in highlight clipping can be seen on the left of Histogram 484 where the lowest F stop of F5.6 has been used. More light produces clipping at the white side but seems to removed the clipping on the dark side of the histogram.
This was more of a challenge than I expected given that the camera I was using only provided the histogram after the image had been taken. I found it difficult to judge a scene beoforehand as to whether the image would likely come out as low, average or high contrast. With hindsight the images chosen for this exercise while the best I could find after a number of 'goes' are not really sufficiently clear enough to demonstrate the difference between the three types of contrast and the impact on the contrast of using different F stops.
Low contrast
 |
| P476: F6.3 @ 1/25 ISO 200 55mm |
 |
| Histogram 476 |
Interestingly, the historgram ( 476 ) depicted on my camera display showed a lower contrast image than the above taken from Photoshop Elements i.e. the histogram was concentrated in a smaller area. This histogram shows no clipping.
 |
| P477: F7.1 @ 1/25 ISO 200 55mm |
 |
| Histogram 477 |
Again no clipping in Histogram 477. Increasing the f stop to 7.1 makes no demonstrable difference.
.
 |
| P478: F8 @ 1/15 ISO 200 55mm |
 |
| Histogram 478 |
Again no clipping either side of the histogram but a slight change at the top of the 'peak' and between the colours comparing the Fstop 8 and Fstop 7.1
Average contrast
 |
| P479: F5.6 @ 1/1250 ISO 200 28mm |
 |
| Histogram 479 |
In this histogram, we can see a more evenly spread out histogram. Although no clipping there is a peak towards the white side suggesting some over exposure.
 |
| P480: F4.5 @ 1/2000 ISO 200 22mm |
 |
| Histogram 480 |
Lowering the F stop to 4.5 produces a similar histogram...no obvious change.
 |
| P481: F6.3 @ 1/800 ISO 200 22mm |
 |
| Histogram 481 |
Raising the Fstop to 6.3 moves the histogram over to the left and slightly more over to the right though the overall spread/ pattern remains the same.
High contrast
 |
| P482: f6.3 @ 1/5 ISO 400 12mm |
 |
| Histogram 482 |
Some slight clipping on the white side of the histogram.
 |
| P483: f7.1 @ 1/4 ISO 400 12mm |
 |
| Histogram 483 |
Here with a smaller aperture than the previous image.there is increased clipping on the right and now on the left.
 |
| P484: f5.6 @ 1/6 ISO 400 12mm |
 |
| Histogram 484 |
This was more of a challenge than I expected given that the camera I was using only provided the histogram after the image had been taken. I found it difficult to judge a scene beoforehand as to whether the image would likely come out as low, average or high contrast. With hindsight the images chosen for this exercise while the best I could find after a number of 'goes' are not really sufficiently clear enough to demonstrate the difference between the three types of contrast and the impact on the contrast of using different F stops.
Monday, 1 April 2013
A sequence of actions project : Your own workflow 2
The purpose of this exercise was to devise a workflow for a specific shooting assignment which would be unstructured and open-ended. I decided to try out the workflow I used previously. Post exercise comments highlighted in red.
Stage 1 Preparation
Theme - Seaside in winter
I chose this theme as I know from experience that it offers a variety of seafront scenes and activities and I wanted to convey the closed for the season feel juxta opposed to people enjoying the seaside anyway.
- Location - I chose Southsea seafront as being easily accessible and knowing that I would likely need more than one visit.
- Timing / weather forecast - given the time of year ( March ) and the recent poor weather, it made sense again to check the 10 day weather foreast for this area to ensure my availability and suitability of weather for outside location opportunities matched up
- Equipment preparation - checked batteries were fully charged, memory card empty and enough storage space on desktop. Decided against using a tripod due to the distance that needed to be covered and the possibility of limited time on each visit due to weather variation.
Stage 2 Site checks / shooting
- Camera settings - check on site - . Past experience suggested that the light on each visit was likely to be very bright at this time of the year and the sun at a difficult angle for some subjects
- Shooting the images - the number of images I would take would be limited by the weather, possibly the time of day ( given where the sun would be in relation to possible subjects ).
Stage 3 Uploading images
- Expect well over 100 images from the combined shoot
Stage 4 Technical check of images
- Will need to allow plenty of time here given the number of images to be checked
Number of images reduced to 76
Stage 5 Interim selection of images for processing
- Edit technically correct images 76 images reduced to 38 images
- Order and number images
- Decided to order and number images at Stage 6 due to quantity
Stage 6 Processing interim selection
- Record technical detail
Stage 7 Final selection
- Selection 14 images selected - examples below:
 |
| P465: f9 @1/400 ISO 200 22mm |
 |
| P466: f4.5 @ 1/2000 ISO 200 22mm |
 |
| P464: f7.1 @ 1/60 ISO 200 18mm |
 |
| P469: f22 @ 1/60 ISO 200 30mm |
 |
P 473: f16 @ 1/400 ISO 200 42mm |
 |
| P474: f8 @ 1/800 ISO 200 55mm |
- Further processing if required ..some cropping of P475
 |
| P475: f9 @ 1/640 ISO 200 218mm cropped |
Stage 8 Saving selected images in :
- Course database yes
- Backup archive database yes
- Learning blog ( as appropriate ) yes
- Print no
Monday, 25 March 2013
A sequence of actions project: Your own workflow 1
Exercise : Your own workflow 1 : establishing workflow
This exercise required me to devise,put into practice and assess a workflow for a time limited portrait session. This is the approach that I took for a time limited portrait session.
Stage 1 Preparation
- Theme - decided to opt for a simple theme i.e. someone with a cycle
- Location - I chose the outside of our garage as I wanted a fairly unobtrusive setting
- Timing / weather forecast - given the time of year ( March ) and the recent poor weather, it made sense to to check the 10 day weather foreast for this area to ensure availability of 'model' and suitability of weather for outside location matched up
- Equipment preparation - checked batteries were fully charged, memory card empty and enough storage space on desktop
Stage 2 Site checks / shooting
- Camera settings check on site - did a quick check outside in location to see how the natural light availabile might warrant certain camera settings e.g. WB / ISO to save time.
- Shooting the images - the number of images I could take were limited by the 'model's availability, the time of day ( afternoon on a cloudy/ bright day ). I did in fact take more 20 as I changed the pose/ camera settings from my original approach to achieve what I was looking for.
Stage 3 Uploading images
A total of 78 images were taken and uploaded.

A total of 78 images were taken and uploaded.
Stage 4 Technical check of images
This stage reduced the number of images taken to 24.
This stage reduced the number of images taken to 24.
Stage 5 Interim selection of images for processing
- Edit technically correct images
- Order, number images and record technical detail
Technical detail was reviewed but not recorded until Stage 6
Stage 6 Processing interim selection
8 images were selected for processing
8 images were selected for processing
Stage 7 Final selection
- Selection
- Further processing if required
The interim selection was whittled down from 8 to 4 images - I decided that
they did not need further processing.
 |
| P453 : f4 @1/125 ISO 100 -0.3 exp. 25mm |
 |
| P455: f5 @ 1/100 ISO 100 33mm |
 |
| P457: f5.6 @ 1/100 ISO 100 -0.3exp. 46mm |
 |
| P459 : f$ @ 1/80 ISO 100 +1exp. 18mm |
Stage 8 Saving selected images in :
- Course database
- Backup archive database
- Learning blog ( as appropriate )
- Print / or upload to web gallery - not done for this exercise
Workflow assessment
I followed the above workflow to the letter as it was very much the process that I would normally take with one exception. This was the stage at which I decided to record the technical detail. This was done later in the process i.e. at Stage 6 due to the large quantity of images taken. Think I'll adopt the same approach for the next exercise to gauge if this works well for me.
Subscribe to:
Posts (Atom)